If you happen to have HTC One then you are lucky just update you HTC One to Sense 5.5 and you will get 25GB of free Google Drive storage. But that's not so easy to get for that you need to follow guide below.
In ADB setup of your device type command "adb devices"
After write the following commands one after the another
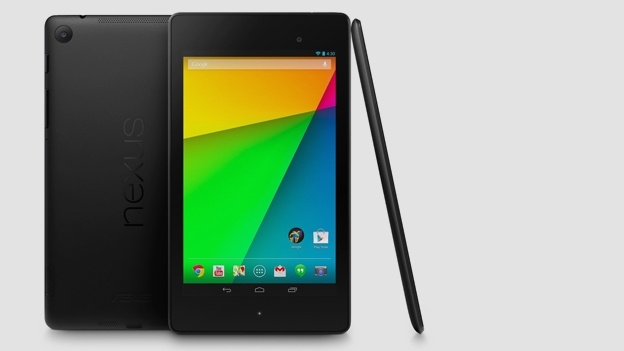
If you can't wait for official Android 4.4 KitKat ROM to arrive for your Nexus 7 then we have a solution for you all. Developer at XDA have managed to create a Android 4.4 kitKat based ROM for you all. If you want to install it then follow this simple guide given below.
If you have 2012 model then download your ROM from here
If you have 2013 model then download your ROM from here
To go to recovery mode download this app from Play Store
Then Wipe data in the recovery mode. After that click on Install button and select install from Zip option. After all this reboot your device and Hence you have Android 4.4 ROM on your Nexus 7 tablet
There are many YouTube downloaders present in the cyberspace out of which YouTube Downloader and Internet Download Manager are the one of the famous and the best software for downloading videos and audios. But one fine day, you might just find out that none of the download apps would work.
Since most of us have Windows PC and if one has a Windows 8 machine, consider yourself blessed. As we all know that Windows 8 has its own market place, the numbers of apps are not large in number as compared to Mac OS but still it’s growing.
An app named “MegaTube” allows you to download videos and even audio in your preferred format. You can choose from 1080P, 720P or even lower. You even have the option to choose the format of audio i.e. whether it should be MP3 or WAV.
How to download videos and audio?
All you need to do is search for the video/audio you want to download.
Then just click on the video where you'll see “save video” and “save as audio” . Just select the option you want.
There are some other settings which you can set according to your needs as shown below.
So were you able to download your videos? If yes, then great but if you were facing any kind of problem do tell us in comments below. We would be happy to help you.
Are you planning to buy Nokia Asha 501 and still confused. So we have purchased Nokia Asha 501 for review purposes and below are some features rest will be discussed in detail review of the device.
Are you going to upload a video on YouTube and you don’t want
anyone to steal your video. Then you should add a Watermark in your video. In
this post, I’m going to describe that how you can add a Watermark in a video using “VideoPad
Video Editor”.
About “VideoPad Video Editor”:
VideoPad is very easy to use and fully featured. This software is good for
making high quality professional videos. You can load a wide variety of video
formats like MP4, AVI, MOV and WMV. There are over 50 transitions and effects to
use. You can save the file in your computer, you can burn it to a DVD or you
can even upload your video directly to YouTube.
Steps to add Watermark in a video using“VideoPad Video Editor”:
Before I start, download the “VideoPad
Video Editor” from the link below and install it.
Launch the “VideoPad Video Editor”. Click on “Add File” and select the video in which you want to add a
Watermark, and then click on “Open”.
Now click and hold the video (added in Step 1)
and drag it in the Timeline of “Sequence
01”. (You can also add your video in Timeline by first selecting the video
and then clicking on Green down Arrow
button in the clip preview which is in middle.)
Again click on “Add File” and select the Watermark (any image file) which you want
to add in your video, and then click on “Open”.
Now click and hold the Watermark and drag it
just above the video in the Timeline of
the “Sequence 01”.
[You can also add your Watermark image in Timeline by first selecting the
Watermark and then clicking on Green
down Arrow button in the clip preview which is in middle. (After clicking
on Green down Arrow, select “Overlay on
Sequence at Cursor” and the click on “Add”.)]
Now hold the edges of the Watermark (added in
Step 4) in the timeline and extend it over the whole timeline.
Now right click on the Watermark and click on “Current Effect Properties”.
A “Video
Effects” Window will appear. Change the Opacity, Position, Rotation and
Size (Scale) according to requirements.
You can also add the effects to your watermark.
Select the effect from the Drop down Menu at the top left and then click on “Add”. At the end, click on “Close”.
That’s it.
Your Watermark is added. Now you can save your video by clicking on “Save
Video” Button. You can save your video in any format, resolution and frame rate or you can upload your video directly to YouTube.
I hope this will
be helpful for you. If any of the readers want to add anything important in
this article than share it with us in comments.
Stay tuned to know more about Windows, Software etc. Don't forget to
like us on Facebook and follow us on Twitter and Google Plus.
Large files in our computer bother us a lot when there’s
less space or we need to send those big files to someone via E-mail. We can compress those large files to small
files by using a simple method. Compressed files are easy to transfer and take
lass time. We can also compress more than one file. The method is described
below:
Locate the file you want to compress and right
click on it.
Move your cursor over “Send To” and then click
on “Compressed (Zipped) Folder”.
You'll see a dialog box showing the progress of compressing.
That’s it. A new Compressed
(Zipped) folder will be created after the complete compressing.
I hope this will be helpful for you. If any of the
readers want to add anything important in this article than share it
with us in comments.
Stay
tuned to know more about Windows etc. Don't forget to like us
on Facebook and follow us on Twitter and Google Plus.
Do you want to change the Network Name (Service Provider’s
Name/ Carrier’s Name) on your iPhone? Well friends, it’s really easy. In this
Post, I’m describing that “How to change the Network Name (Service Provider’s
Name/Carrier’s Name) on your iPhone?”
First of all, Jail break your iPhone. (If it’s already done then go on for Step
2).
Unlock your iPhone and go to Cydia>Manage>Sources.
Now press Edit
and then Add.
You’ll see a window asking to enter the “Cydia/APT URL”. Write “sinfuliphonerepo.com” and press “Add Source”.
You’ll see a Source Warning, press “Add
Anyway”.
After adding the source, open it. You can find
it named as “SiNful iPhone Repo” in
Sources.
Scroll down to S and look for the “Springtomize
2 Cracked”. Open it.
Press Install
and then Confirm. The
Downloading will start and it will take some time.
After complete downloading and installation,
you’ll see a “Restart SpringBoard”
key. Press it to restart your Spring Board.
After complete restart of the Spring Board, go
to Settings>Springtomize>Status
Bar.
Now Turn On
the “Use Custom Carrier” and just
below it, write your name or whatever you want. (This is the text which will be
shown in the place of your network name).
Now go back to Springtomize and click on “Reload”
on top right corner.
A box will appear asking “Choose Action”. Click on “Respring”.
After complete respring, you can check the name
of your service provider is changed.
(Watch the video below to understand briefly).
I hope this will
be helpful for you. If any of the readers want to add anything important in
this article than share it with us in comments.
Stay tuned to know more about Gadgets, iPhone etc. Don't forget to like
us on Facebook and follow us on Twitter and Google Plus.
You are looking for some stylish navigation of spring board
icons on iPhone? Then you are looking for “Barrel”.
In this post, I’m describing that “How
to install Barrel on your iPhone?”
First of all, Jail break your iPhone. (If it’s already done then go on for Step
2).
Unlock your iPhone and go to Cydia>Manage>Sources.
Now press Edit and then Add.
You’ll see a window asking to enter the “Cydia/APT URL”. Write “sinfuliphonerepo.com” and press “Add Source”.
You’ll see a Source Warning, press “Add
Anyway”.
After adding the source, open it. You can find
it named as “Sinful iPhone Repo” in
Sources.
Scroll down to B and look for the “Barrel
Cracked”. Open it.
Press Install
and then Confirm. The
Downloading will start and it will take some time.
After complete downloading and installation,
you’ll see a “Restart SpringBoard”
key. Press it to restart your Spring Board.
After complete restart of the Spring Board, you
can check if the barrel is working.
To change the barrel effects, go to Settings>Barrel>Mode. You can
choose the type of barrel effect you like.
Check the video below for brief:
I hope this will
be helpful for you. If any of the readers want to add anything important in
this article than share it with us in comments.
Stay tuned to know more about Gadgets, iPhone etc. Don't forget to like
us on Facebook and follow us on Twitter and Google Plus.
Do you have an iPhone and really tired of trying different
complex methods of converting etc. to get a ringtone for your iPhone? Well, you
don’t need to do so any more. In this Post, I’m describing a method to get
ringtones on your iPhone directly without using iTunes and your Computer.
First of all, Jail Break your iPhone. (If it’s
already done then go on for Step 2).
Unlock your iPhone and go to
Cydia>Manage>Sources.
Now press Edit and then Add.
You’ll see a window asking to enter the
“Cydia/APT URL”. Write “http://repo.hackyouriphone.org” and press “Add Source”.
After adding the source, open it. You can find
it named as “HackYouriPhone” in Sources.
Scroll down to U and look for the “Unlim Tones”.
You’ll may find many of them, open the one, in which "Download Ringtones on the go including..." is written in the description.
Press Install and then Confirm. The Downloading
will start and it will take some time.
After complete downloading and installation,
you’ll see a “Restart SpringBoard” key. Press it to restart your Spring Board.
Now you’ll find an “Unlim Tones” icon on your
Spring Board. Open it.
You’ll see many options like “Top Ringtones”,
“Top by Genres” etc. Choose your favorite ringtone from available options.
Open the ringtone and click on the Image on the
top left corner to hear the ringtone.
Press “Add to Ringtones” key. Your ringtone will
start downloading.
After complete downloading, go to back to your
Spring Board and then go to Settings>Sounds>Ringtone.
You will find the ringtone you just downloaded
in Step 12. Choose it as your ringtone. That’s it.
Watch the video below for brief:
I hope this will
be helpful for you. If any of the readers want to add anything important in
this article than share it with us in comments.
Stay tuned to know more about Gadgets, iPhone etc. Don't forget to like
us on Facebook and follow us on Twitter and Google Plus.